
CXC Home | Search | Help | Image Use Policy | Latest Images | Privacy | Accessibility | Glossary | Q&A
Return to openFITS Page
Tutorial: Broadband Image of Crab Nebula and Pulsar
- Download Crab data
NOTE: you must right-click and choose "Save File As" to save the file
- Crab 0.3-10 keV Fits File [352 KB]
- Open file in GIMP and Switch to RGB
- Use File->Open and select the file you just downloaded
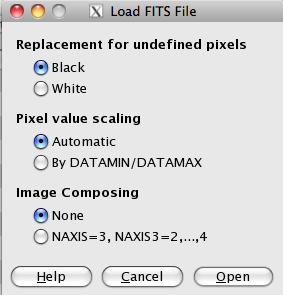
- Note that the default parameters in the "Load FITS File" dialog box should work well for this example
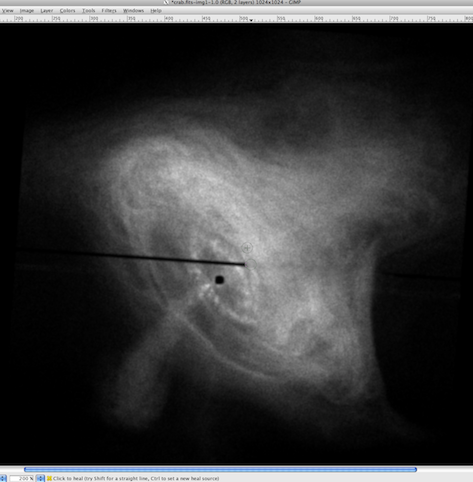
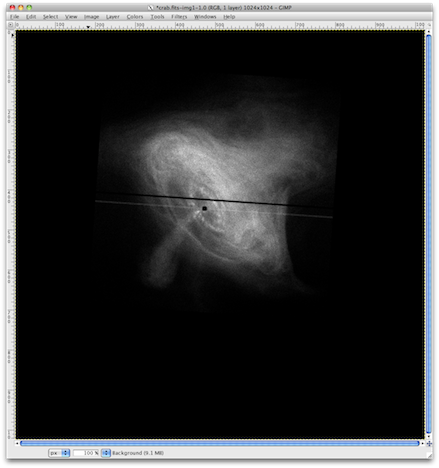
- You should see something like the image below.
- The image you've opened is Grayscale and will need to be changed to RGB in order to colorize the layers. Do this by clicking on Image->Mode->RGB.
- Adjust Levels

- Your first view of the image was very dark. Even though GIMP automatically rescaled the FITS data, the image still needs to have its pixel levels adjusted.
- Open the Levels dialog box by selecting Colors->Levels and feel free to adjust the small triangles under the histogram plot in "Input Levels" to your liking.
- One would typically only adjust the gamma of each layer by only adjusting the middle slider to the left or right depending on how you want to adjust the level.
- The trick with adjusting the levels at this stage is to bring out faint details in the object but minimize the amount of background "noise" in the image. Play around with the sliders and see how subtle changes in the levels affect the image.
- Apply a Smoothing Algorithm
- At this point, you're starting to see a nice image developing on the screen, but you may notice a lot of pixilated noise throughout the image. This is where a good smoothing algorithm can really take your image to the next level!
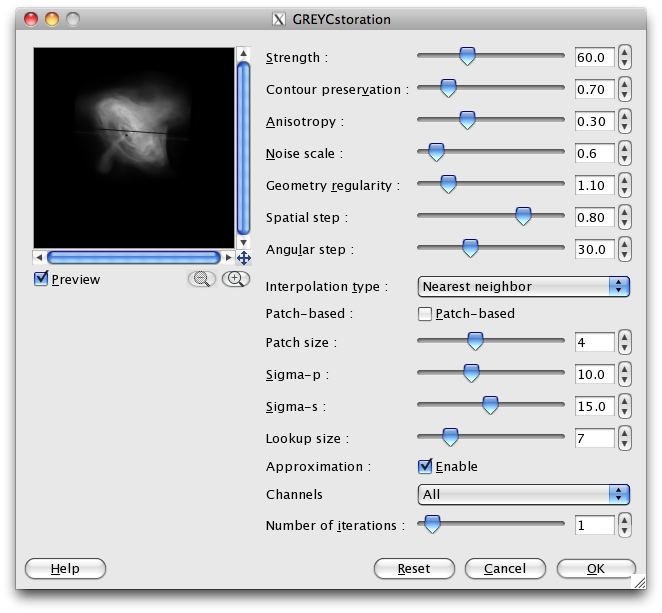
- In our previous tutorial, we used the GREYCstoration smoothing algorithm which works wonders with faint structures in X-ray data. The Crab gives off so much X-ray light, that smoothing can be as simple as applying a slight Gaussian Blur to the data set. This can be done through Filters->Blur->Gaussian Blur. Even a blur radius of 2 pixels will give good results. Of course if you want to see what GREYCstoration can do with this data set, feel free to explore!
- Select the GREYCstoration smoothing algorithm found in Filters->Enhance->GREYCstoration. Note that if you're using the latest version of GIMP (v2.8) with G'MIC v 1.5.2.4 GREYCstoration has been discontinued, and it's features incoporated into the main G'MIC tools. To access GREYCstoration type smoothing, select Filters->G'MIC... and in the G'MIC window, select Enhancement->Smooth [anisotropic] and you'll be greeted with an interface similar to the GREYCstoration interface for contour preserved smoothing.
- There are a lot of options in the GREYC window, play around with them and discover for yourself what works.
- Artifact Cleanup

- Upon opening your downloaded image, you may have noticed some odd looking image artifacts like the dark line running through the nebula, and the black spot with light lines stretching out from either side. These are not actually part of the source, they are instrumental artifacts that will need to be carefully removed without introducing new artifacts.
- We know that the central black dot is actually the source of the most intense X-rays in the image; so intense that the detector was not able to accurately record the light coming from that region and instead was saturated to the point that there is no useful data, hence the "black hole". We can simply, but carefully, replace the black in this region with white, to indicate the most intense light in the image.
- The light lines extending from this central region are "readout streaks" created by residual X-ray photons streaking across the detector as the image is transferred from the CCD. You would see similar artifacts on your own digital cameras, or cell phone cameras when they are exposed to bright pinpoint sources of light, like the sun. These lines can be removed by using GIMP's handy "Healing Tool" which is designed to repair image irregularities.
- To use the tool, select it in the "Toolbox" and then CTRL-click a region of the image near the artifact to define the source pixels, then click on the artifact itself and drag across. The Healing Tool algorithm will blend pixels from your selected region into the new region and repair the irregularity in the process. This same approach can be used on the dark band in the image as well. You should try out different parameters of the healing tool, such as opacity, and brush size, and be careful when blending to follow contours and structures of the image. A well done healing should be completely seamless. A little patience and a keen eye can go a long way!
- Add a Splash of Color!
- One limitation of using GIMP for a 3 color image is that GIMP does not use what are known in Photoshop as "Adjustment Layers". Adjustment Layers allow you to make changes to your layers in a non-destructive way. That is to say that you do not actually change the layer itself, you apply an additional layer to the original layer to make changes. This preserves the original layer so you can always go back to its original state at any time. The changes we'll make here have to be applied to the original layer, and once the file has been saved and closed, you cannot back out of those changes. One workaround to this is to duplicate your original layer and do all of your work on the duplicate so that you can always go back to the original if need be. GIMP v2.8 has laid the groundwork for an approach to adjustment layers known as a node-based workflow. When fully implemented, this will allow GIMP users to perform non-destructive editing to various layers within an image.
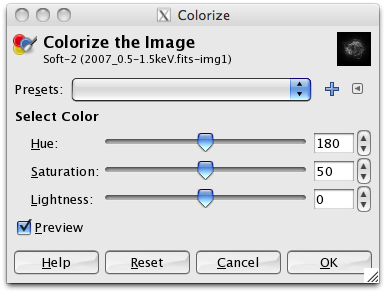
- As a broadband image, you would typically apply a single gradient map of color to the image to show X-ray intensity. To apply color to your layer, go to Colors->Colorize.
- You'll notice that as you sweep the Hue bar from left to right, the numbers increase from 0 to 360. That is because Hue is pulled directly from the color wheel; a 360 degree representation of the visible light spectrum (red, orange, yellow, green, blue, violet). Imagine that you've taken the 360 degree color wheel and layed it out as a flat strip on a table. Now, you're selecting colors by specifying the location on that strip in degrees. The color red just happens to correspond to 0 degrees on the color wheel, hence 0 in the Hue selector.
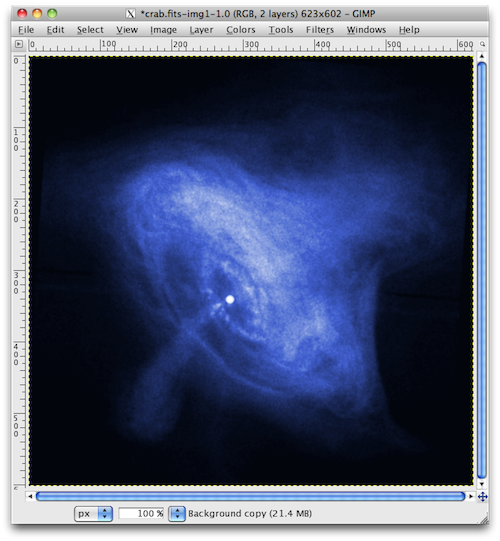
- Play with the color selections to find a color that you like. Broadband X-ray images are usually portrayed in blue (Hue=220), but it can be a matter of taste.
- Depending on your color choice, you may end up with something similar to the image below when you are done.
- The Finishing Touches
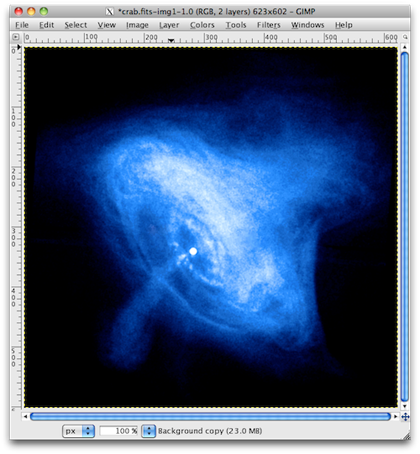
- Now that we've added color to the image, it is really starting to come together. Yet, still more could be done to make the image really pop!
- At this point, you can let some creative freedom loose and explore various tools within GIMP to bring out more of the color and brighten the image up.
- In the example below, I've done another round of levels editing using the "Curves" tool in Colors->Curves to emphasize the saturation of the brightest levels in the image, while slightly suppressing the lowest levels. I also used the "Color Balance" tool in Colors->Color Balance to bring out more of the blues.
- As you become more comfortable using your image editing software, you will develop an intuitive sense of what you can do next to realize your true vision!
For More Information
- See the Chandra Education page
- Creating 3-color images using SAO DS9
- Detailed information about Chandra's data flow
Revised: February 25, 2015