
CXC Home | Search | Help | Image Use Policy | Latest Images | Privacy | Accessibility | Glossary | Q&A
Return to openFITS Page
Introduction and Background - Images and Color
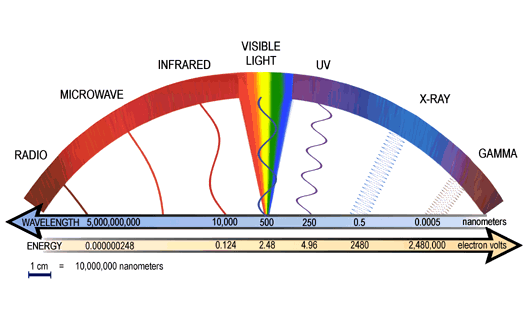
The colors we see are the result of how the human eye and brain perceive different wavelengths of light in the visible part of the electromagnetic spectrum - roughly radiation in the range of 380 nm to 740 nm. The ability of the human eye to distinguish colors is based on the varying sensitivity of different cells in the retina to light of different wavelengths.
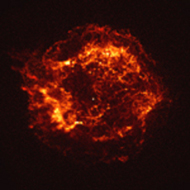
A false-color image is an image that depicts a subject in colors that differ from those a faithful full-color photograph would show. The term false-color is typically used to describe images whose colors represent measured intensities outside the visible portion of the electromagnetic spectrum (ie. invisible to the human eye). Color astronomical images are usually false-colored, though the term false-color is misleading here. Coloring an astronomical image involves the careful selection of colors chosen to represent some characteristic in an image, such as intensity, energy or chemical composition. "True Color" images translate intensity information from the invisible to the visible by assigning colors to individual images and combining them. The colors chosen, usually Red, Green and Blue are usually mapped according to wavelength such that the longest wavelengths of light present in the image are mapped to Red, while shorter wavelengths move through Green and Blue. The colors selected are representative of the physical processes underlying the objects in the images, and display in a single image, as much information as possible that's available from the data; think of it as "representative color". Raw, grayscale image data are transported into image analysis software where adjustments are made to emphasize the individual features or processes that scientists are interested in - or enhanced for aesthetic purposes. It is important to note that at no point in this process are the images modified to create something that isn't already present in the data. Astronomical image processors maintain a careful balance of art and science enhancing the image while meticulously preserving the integrity of the data. See x-ray 101 for more information on how Chandra "sees" x-ray light.
Flexible Image Transport System (FITS) Image File Format
FITS is a digital file format used mainly by astronomers to store, transmit, and manipulate scientific data and images. The FITS format was designed specifically with scientific data in mind and includes a rich, human readable, ASCII metadata header capable of providing very detailed information about the contents of a particular file. These details include very specific information regarding the nature and source of the data, the time when the data were created, as well as photometric and spatial calibration information. In the openFITS project, you will use raw or minimally processed FITS data from the Chandra X-ray Observatory to create your own color images! The FITS Index will be a repository for all of the FITs files used in the project.A Word on Software and Open Source
Image Scaling: A Quick Lesson In Bit Depth
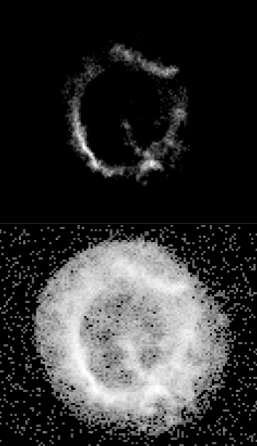
Any image that you view on your computer screen has a bit depth associated with it. Bit depth refers to the number of colors that can be displayed in any one pixel in your image. The higher the bit depth, the more colors used in the image, and consequently, the larger the file size. In an 8-bit gray-scale image, for example, each pixel within the image can appear as one of 256 different shades of gray. The number 256 comes from the fact that bit depth increases as powers of 2, 28 = 256. A 16-bit image, therefore contains 216 or 65,536 potential color values for each pixel. Most astronomical images come in the form 16-bit images, and with over 65,000 color values per pixel, there is more information, or dynamic range in an image than can be displayed on the screen, or even viewed by human eyes. Image scaling is used to project the dynamic range of an image into a range that is suitable for display on a monitor. A scale function manipulates the pixel values before projecting them to the screen. The example on the left shows a linear scaling of the supernova remant E0102 on top of the same image scaled logarithmically.The ability to properly scale your data before working with it is crucial to creating dramatic and interesting images.Installing GIMP and G'MIC
Point your browser to http://www.gimp.org/downloads to download the latest version of GIMP - you will automatically be directed to the right version for your OS.
Disclaimer: The Chandra X-ray Center and the Harvard-Smithsonian Center for Astrophysics do not endorse any particular vendor's products. Please read all license agreements before downloading any software.

Revised: January 25, 2022